阅读(1276)
赞(3)
层叠分类器
2017-10-14 11:08:53 更新
目标
在本教程中,您将学习如何:
- 使用cv :: CascadeClassifier类来检测视频流中的对象。特别是我们将使用的功能:cv :: CascadeClassifier :: load加载一个.xml分类器文件。它可以是哈尔还是LBP分类器cv :: CascadeClassifier :: detectMultiScale来执行检测。
Code
本教程代码如下所示。您也可以从这里下载
#include "opencv2/objdetect.hpp"
#include "opencv2/videoio.hpp"
#include "opencv2/highgui.hpp"
#include "opencv2/imgproc.hpp"
#include <iostream>
#include <stdio.h>
using namespace std;
using namespace cv;
void detectAndDisplay( Mat frame );
String face_cascade_name, eyes_cascade_name;
CascadeClassifier face_cascade;
CascadeClassifier eyes_cascade;
String window_name = "Capture - Face detection";
int main( int argc, const char** argv )
{
    CommandLineParser parser(argc, argv,
        "{help h||}"
        "{face_cascade|../../data/haarcascades/haarcascade_frontalface_alt.xml|}"
        "{eyes_cascade|../../data/haarcascades/haarcascade_eye_tree_eyeglasses.xml|}");
    cout << "\nThis program demonstrates using the cv::CascadeClassifier class to detect objects (Face + eyes) in a video stream.\n"
            "You can use Haar or LBP features.\n\n";
    parser.printMessage();
    face_cascade_name = parser.get<string>("face_cascade");
    eyes_cascade_name = parser.get<string>("eyes_cascade");
    VideoCapture capture;
    Mat frame;
    //-- 1. Load the cascades
    if( !face_cascade.load( face_cascade_name ) ){ printf("--(!)Error loading face cascade\n"); return -1; };
    if( !eyes_cascade.load( eyes_cascade_name ) ){ printf("--(!)Error loading eyes cascade\n"); return -1; };
    //-- 2. Read the video stream
    capture.open( 0 );
    if ( ! capture.isOpened() ) { printf("--(!)Error opening video capture\n"); return -1; }
    while ( capture.read(frame) )
    {
        if( frame.empty() )
        {
            printf(" --(!) No captured frame -- Break!");
            break;
        }
        //-- 3. Apply the classifier to the frame
        detectAndDisplay( frame );
        char c = (char)waitKey(10);
        if( c == 27 ) { break; } // escape
    }
    return 0;
}
void detectAndDisplay( Mat frame )
{
    std::vector<Rect> faces;
    Mat frame_gray;
    cvtColor( frame, frame_gray, COLOR_BGR2GRAY );
    equalizeHist( frame_gray, frame_gray );
    //-- Detect faces
    face_cascade.detectMultiScale( frame_gray, faces, 1.1, 2, 0|CASCADE_SCALE_IMAGE, Size(30, 30) );
    for ( size_t i = 0; i < faces.size(); i++ )
    {
        Point center( faces[i].x + faces[i].width/2, faces[i].y + faces[i].height/2 );
        ellipse( frame, center, Size( faces[i].width/2, faces[i].height/2 ), 0, 0, 360, Scalar( 255, 0, 255 ), 4, 8, 0 );
        Mat faceROI = frame_gray( faces[i] );
        std::vector<Rect> eyes;
        //-- In each face, detect eyes
        eyes_cascade.detectMultiScale( faceROI, eyes, 1.1, 2, 0 |CASCADE_SCALE_IMAGE, Size(30, 30) );
        for ( size_t j = 0; j < eyes.size(); j++ )
        {
            Point eye_center( faces[i].x + eyes[j].x + eyes[j].width/2, faces[i].y + eyes[j].y + eyes[j].height/2 );
            int radius = cvRound( (eyes[j].width + eyes[j].height)*0.25 );
            circle( frame, eye_center, radius, Scalar( 255, 0, 0 ), 4, 8, 0 );
        }
    }
    //-- Show what you got
    imshow( window_name, frame );
}
结果
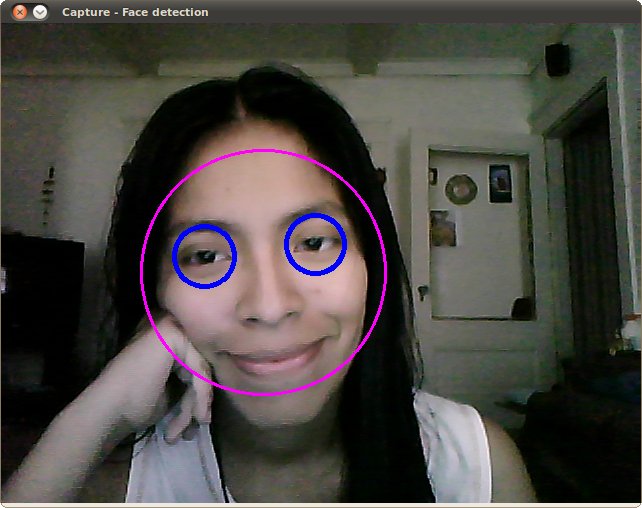
- 以下是运行上述代码并将内置网络摄像头的视频流用作输入的结果:

确保程序会找到文件haarcascade_frontalface_alt.xml和haarcascade_eye_tree_eyeglasses.xml的路径。它们位于opencv / data / haarcascades中
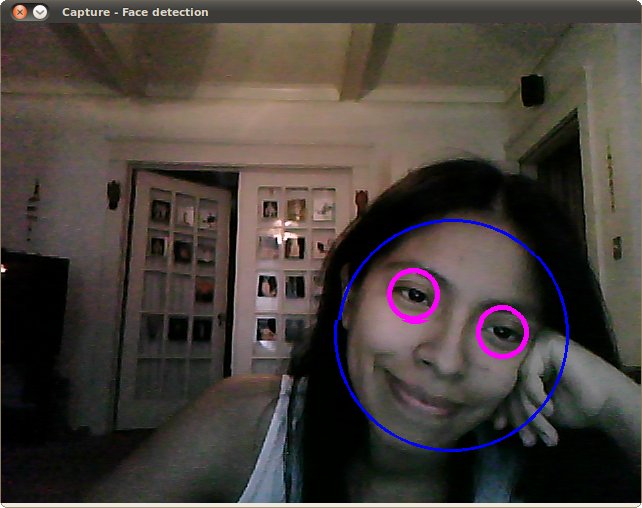
- 这是使用文件lbpcascade_frontalface.xml(LBP训练)进行脸部检测的结果。对于眼睛,我们继续使用教程中使用的文件。


