本篇文章主要介绍了 redis 中的主从复制的基本概念,以及 Java 语言中使用 Lettuce 客户端在 Redis 的主从复制模式下命令执行的操作。以下是详情内容,希望对于大家的学习和工作能够有所帮助!
1 redis主从复制的概念
多机环境下,一个redis服务接收写命令,当自身数据与状态发生变化,将其复制到一个或多个redis。这种模式称为主从复制。在redis中通过命令salveof命令让执行该命令的redis复制另一个redis数据与状态。我们将主服务器称为master,从服务器称为slave。
主从复制保证了网络异常正常时,网络断开重的情况下将数据复制。网络正常时master会通过发送命令保持对slave更新,更新包括客户端的写入,key的过期或被逐出等网络异常,master与slave连接断开一段时间,slave重连上master后会尝试部分重同步,重新获取连接断开期间丢失的命令。当无法进行部分重同步,则会执行全量重同步。
2 为什么需要主从复制
为了保证数据不丢失,有时会用到持久化功能。但这样会增加磁盘IO操作。通过使用主从复制,可以替代持久化并减少IO操作,降低延迟提高性能。
主从模式下,master负责处理写,slave负责读。虽然主从同步会导致在数据存在不一致窗口,但可以增加读操作的吞吐量。主从模式避免了redis单点风险。通过副本提高系统可用性。当master挂掉,从slave中选举新的机器作为master保证系统可用。
3 主从复制配置及原理
主从复制可以分为三个阶段:初始化、同步、命令传播。
初始化:从服务器执行完 slaveof 命令后,slave与master建立socket连接。连接建立完毕后通过ping进行心跳检测,若master正常,则返回响应。如果出现故障收不到响应,那么slave会重新尝试连接master。如果master设置了认证信息,则会再检查认证数据是否正确。如果认证失败,则会报错。
同步:当初始化完毕,master收到slave的数据同步命令后,需要判断是否执行全量同步还是部分同步。
命令传播:同步完成后,master与slave通过心跳检测判断对方是否在线。slave同时向master发送自己复制缓冲区的偏移量。master根据这些请求,判断是否向slave同步新产生的命令。slave收到同步的命令后执行,最终与master保持同步。
4 使用Lettuce在主从模式下执行命令
常用的Java Redis客户端有Jedis、Redission、Lettuce。这里将通过Lettuce来演示主从模式下的读写分离命令执行。
        <dependency>
            <groupId>io.lettuce</groupId>
            <artifactId>lettuce-core</artifactId>
            <version>5.1.8.RELEASE</version>
        </dependency>
下面通过
package redis;
import io.lettuce.core.ReadFrom;
import io.lettuce.core.RedisClient;
import io.lettuce.core.RedisURI;
import io.lettuce.core.api.sync.RedisCommands;
import io.lettuce.core.codec.Utf8StringCodec;
import io.lettuce.core.masterslave.MasterSlave;
import io.lettuce.core.masterslave.StatefulRedisMasterSlaveConnection;
import org.assertj.core.util.Lists;
 class MainLettuce {
    public static void main(String[] args) {
        List<RedisURI> nodes = Lists.newArrayList(
                RedisURI.create("redis://localhost:7000"),
                RedisURI.create("redis://localhost:7001")
        );
        RedisClient redisClient = RedisClient.create();
        StatefulRedisMasterSlaveConnection<String, String> connection = MasterSlave.connect(
                redisClient,
                new Utf8StringCodec(), nodes);
        connection.setReadFrom(ReadFrom.SLAVE);
        RedisCommands<String, String> redisCommand = connection.sync();
        redisCommand.set("master","master write test2");
        String value = redisCommand.get("master");
        System.out.println(value);
        connection.close();
        redisClient.shutdown();
    }
}
补充:Redis 客户端之Lettuce配置使用(基于Spring Boot 2.x)
开发环境:使用Intellij IDEA + Maven + Spring Boot 2.x + JDK 8
Spring Boot 从 2.0版本开始,将默认的Redis客户端Jedis替换问Lettuce,下面描述Lettuce的配置使用。
1.在项目的pom.xml文件下,引入Redis在Spring Boot 下的相关Jar包依赖
    <properties>
        <redisson.version>3.8.2</redisson.version>
    </properties>
    <dependencies>
        <dependency>
            <groupId>org.springframework.boot</groupId>
            <artifactId>spring-boot-starter</artifactId>
        </dependency>
        <dependency>
            <groupId>org.springframework.boot</groupId>
            <artifactId>spring-boot-starter-test</artifactId>
            <scope>test</scope>
        </dependency>
        <dependency>
            <groupId>org.springframework.boot</groupId>
            <artifactId>spring-boot-starter-data-redis</artifactId>
        </dependency>
        <dependency>
            <groupId>org.apache.commons</groupId>
            <artifactId>commons-pool2</artifactId>
        </dependency>
    </dependencies>
2.在项目的resources目录下,在application.yml文件里添加lettuce的配置参数
#Redis配置
spring:
  redis:
    database: 6  #Redis索引0~15,默认为0
    host: 127.0.0.1
    port: 6379
    password:  #密码(默认为空)
    lettuce: # 这里标明使用lettuce配置
      pool:
        max-active: 8   #连接池最大连接数(使用负值表示没有限制)
        max-wait: -1ms  #连接池最大阻塞等待时间(使用负值表示没有限制)
        max-idle: 5     #连接池中的最大空闲连接
        min-idle: 0     #连接池中的最小空闲连接
    timeout: 10000ms    #连接超时时间(毫秒)
3.添加Redisson的配置参数读取类RedisConfig
package com.dbfor.redis.config;
import org.springframework.cache.annotation.CachingConfigurerSupport;
import org.springframework.cache.annotation.EnableCaching;
import org.springframework.context.annotation.Bean;
import org.springframework.context.annotation.Configuration;
import org.springframework.data.redis.connection.lettuce.LettuceConnectionFactory;
import org.springframework.data.redis.core.RedisTemplate;
import org.springframework.data.redis.serializer.GenericJackson2JsonRedisSerializer;
import org.springframework.data.redis.serializer.StringRedisSerializer;
@Configuration
@EnableCaching
public class RedisConfig extends CachingConfigurerSupport {
    /**
     * RedisTemplate配置
     * @param connectionFactory
     * @return
     */
    @Bean
    public RedisTemplate<String, Object> redisTemplate(LettuceConnectionFactory connectionFactory) {
        // 配置redisTemplate
        RedisTemplate<String, Object> redisTemplate = new RedisTemplate<>();
        redisTemplate.setConnectionFactory(connectionFactory);
        redisTemplate.setKeySerializer(new StringRedisSerializer());//key序列化
        redisTemplate.setValueSerializer(new GenericJackson2JsonRedisSerializer());//value序列化
        redisTemplate.afterPropertiesSet();
        return redisTemplate;
    }
}
4.构建Spring Boot的启动类RedisApplication
package com.dbfor.redis;
import org.springframework.boot.SpringApplication;
import org.springframework.boot.autoconfigure.SpringBootApplication;
@SpringBootApplication
public class RedisApplication {
    public static void main(String[] args) {
        SpringApplication.run(RedisApplication.class);
    }
}
5.编写测试类RedisTest
package com.dbfor.redis;
import org.junit.Test;
import org.junit.runner.RunWith;
import org.springframework.beans.factory.annotation.Autowired;
import org.springframework.boot.test.context.SpringBootTest;
import org.springframework.data.redis.core.RedisTemplate;
import org.springframework.stereotype.Component;
import org.springframework.test.context.junit4.SpringRunner;
@SpringBootTest
@RunWith(SpringRunner.class)
@Component
public class RedisTest {
    @Autowired
    private RedisTemplate redisTemplate;
    @Test
    public void set() {
        redisTemplate.opsForValue().set("test:set1", "testValue1");
        redisTemplate.opsForSet().add("test:set2", "asdf");
        redisTemplate.opsForHash().put("hash1", "name1", "lms1");
        redisTemplate.opsForHash().put("hash1", "name2", "lms2");
        redisTemplate.opsForHash().put("hash1", "name3", "lms3");
        System.out.println(redisTemplate.opsForValue().get("test:set"));
        System.out.println(redisTemplate.opsForHash().get("hash1", "name1"));
    }
}
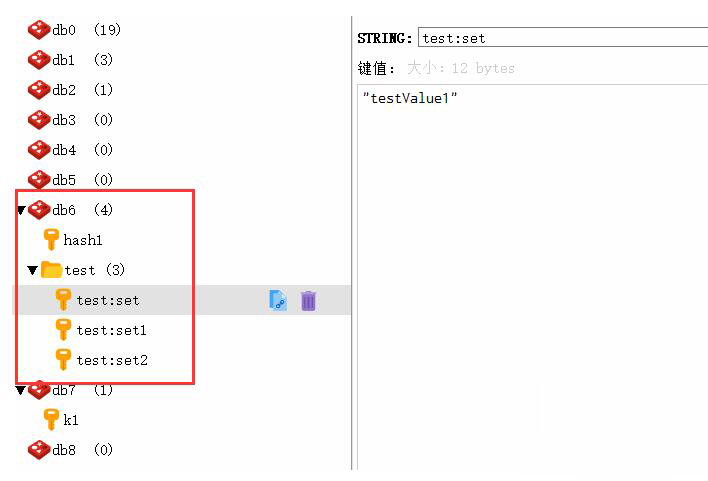
6.在Redis上查看运行结果

从上图可以看到,Lettuce配置操作数据库成功!
以上为关于 Java 中如何使用 Lettuce 客户端在 redis 的主从复制模式下命令执行的操作的详细内容,希望能给大家一个参考,也希望大家多多支持W3Cschool。如有错误或未考虑完全的地方,望不吝赐教。


